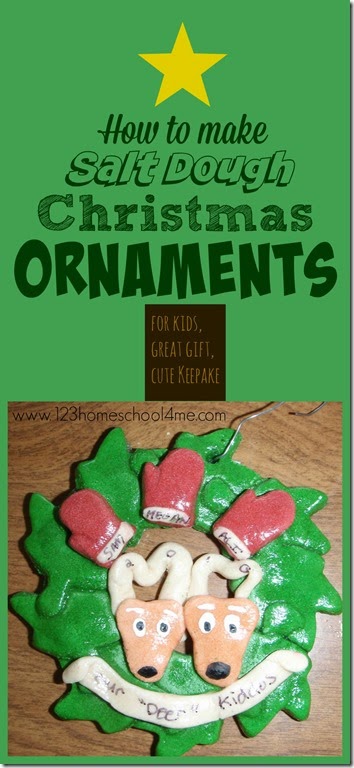
Did you know you can easily make your own personalized dough ornaments? Not only are personalized dough christmas ornaments a fun Christmas ornament craft for kids and adult alike to make, but they last forever! So follow our simple salt dough christmas ornaments and we will teach you how to make salt dough ornaments shiny with your toddler, preschool, pre-k, kindergarten, first grade, and elementary age kids. The options are endless, and these keep forever!
personalized dough ornaments
I don’t know about you, but I cringe when I see the price tag on some of the cute personalized ornaments out there. They are cute and I love getting ornaments that feature an interest of my child to represent that year with their name on it…. but $13+ for each one when you have several children gets VERY expensive! Don’t worry, I have found the best salt dough ornament recipe so you can make your own precious, personalized salt dough Christmas ornaments to decorate your tree, as a kid made Christmas present, or a fun Christmas activity with toddlers, preschoolers, kindergartners, grade 1, and elementary age kids in December. Making ornaments is a classic Christmas craft for kids. They love to create and then see their creations hanging on the tree!
So I learned to make my own salt dough ornaments. Now I want you to know, I am the LEAST crafty person on the planet. I am a good baker, birthday planner, and have lots of creative ideas – but actually making something crafty is not my thing. So if I can do this – YOU CAN DO IT TOO! Let me teach you the easy way how to make salt dough ornaments.
salt dough christmas ornaments
To make this easy salt dough ornaments recipe start by mixing these 3 ingredients in a medium bowl:
2 cups flour
1 cup salt
1 cup water
how to make salt dough ornaments shiny
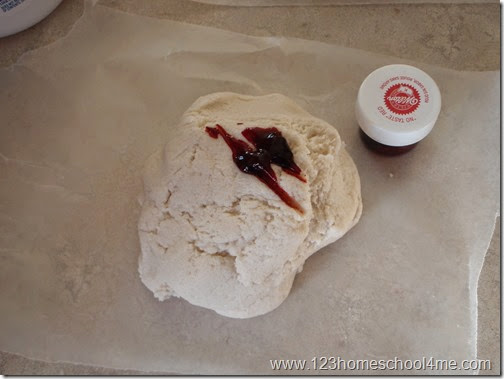
Now you can add food coloring to small sections of ornament dough depending on what color ornaments you are planning on making. I used Wilton food gel coloring as it gives really rich colors without adding a lot of liquid to the dough that you will have to compensate for by adding flour.
salt dough ornament recipe
Note: You can just paint the ornaments instead, but I like to color the actual dough (that way you don’t miss crevices painting it). Plus it makes it more kid friendly as painting just little parts is difficult for even elementary age kids.
salt dough christmas ornaments recipe
Next you will need to shape your ornaments. Cookie cutters are a great starting point for most ornaments. Then you can add details to make them more interesting after that.
christmas salt dough ornaments
This is simple enough for kids to make and versatile enough for adults to make beautiful ornaments too.
My daughter Minnie, who was just 3 when we did this activity, just cut out shapes with cookie cutters. Goofy, who was 6, made the bear (above) by using a cookie cutter to shape the main ornament and adding different pieces of dough to personalize his creation.
how to make salt dough ornaments
Above you can see some ornaments I made. The dough is so versatile!
I made the kids with Santa hats in front of the tree which I will later add facial features and give to my sister-in-law to represent their family. A lovely personalized Christmas gift from the heart. The gingerbread girl (right) is for my niece.
how to make homemade ornaments
Place all finished ornament creations on a baking sheet. Make sure to use a straw to make a hole for the ornament hook (don’t miss this step – you cannot do it once the ornament cooks).
Now cook the ornaments at 225 F for 3-6 hours (depending on the thickness). It is such a low temperature it won’t burn.
Note: My six year old made the slice of Pepperoni Pizza at the bottom because a tree is not complete without pizza, right =)
how long to bake salt dough ornaments
I suggest you personalize the ornaments once they cool by adding faces, names, years, etc. You can use Acrylic Paint for the faces and permanent fine tip sharpies for names. .Don’t use the washable Crayola stuff – it doesn’t hold up as well.
salt dough xmas ornaments
To give it the really polished, shinny finish you’ll see on the “professional” keepsake personalize ornaments you need to add a shinny top coat by dipping them in Lacquer. You don’t have to, but you really want to. Besides sealing the ornaments so they don’t crack, it gives them a shiny finished look.
recipe for salt dough ornaments
All you do is put the ornament on a hook, dip in lacquer and put on wax sheet to dry. To give it a really polished look give it 2-3 coats with 24 hours between each coat to allow it to fully dry. Take a look at the picture to see the difference in ornaments not coated in Lacquer and those that are. The ones on the left have NOT bee coated in Lacquer. The coating really intensifies the colors too!!
how to make dough christmas ornaments
I used this same recipe to make keepsake handprint ornaments of my kiddos for their 1st Christmas too. My kids give some of their ornaments to grandparents and the rest they get to hang on their tree in the play room that houses their ornaments. (They decorated it themselves & they can “re-decorate” it throughout the season).
I do pull out any especially wonderful creations the kids make as keepsakes that I put on our family tree or in a box to give to them when they are older.
salt dough ornaments recipe
So flip through those personalized ornament catalogs if you need some inspiration, but then make them them yourself. Not only will you save lots of money, your kids will love to make ornaments and the ones you made with your own hands will be such precious, treasured keepsakes!
Make your own Salt Dough Christmas Ornaments for a fraction of the cost at the store. These are fun-to-make, options are endless, and these keep forever!
Prep Time5 minutesmins
Cook Time30 minutesmins
Servings: 2cups
Author: Beth Gorden
Ingredients
2cupsflour
1cupsalt
1cupwater
Winton Gel Food Coloring
Parchment Paper
lacquer optional
paint or sharpiesoptional
Instructions
Mix first 3 ingredients together until smooth. Add food coloring to sections until thoroughly mixed in. Roll out on parchment paper (if iti s too sticky, add a little flour at a time). Now cut out with Christmas shaped cookie cutters and place on cookie sheet lined with parchment paper.
Preheat overn to 225 F. Bake ornaments for 3-6 hours depending on thickness. You want it to bake at low heat for a long time to make sure they are cooked through. Don't worry, it is such a low temperature it wont burn.
Once your ornaments have thoroughly cooled. Use paint or sharpies to add any extra decorations. Allow to thoroughly dry / set again.
Finally, dip in lacquer to create at truly beautiful, polished ornament that will look professional. This will not only seal the ornament, but will also make the colors look more deep and rich. All you do is put the ornament on a hook, dip in lacquer and put on wax sheet to dry. To give it a really polished look give it 2-3 coats with 24 hours between each coat to allow it to fully dry. ** Lacquer is a chemical and has a strong odor. Please read instructions on the side of the can and follow them carefully. Adult supervision requrired on this step!
Beth Gorden is the creative multi-tasking creator of 123 Homeschool 4 Me. As a busy homeschooling mother of six, she strives to create hands-on learning activities and worksheets that kids will love to make learning FUN! With over 20 years educating children, she has created over 1 million pages of printables to help teach kids alphabet, math, science, English grammar, history, and so much more! Beth is also the creator of 2 additional sites with even more educational activities and FREE printables - www.kindergartenworksheetsandgames.com and www.preschoolplayandlearn.com. Beth studied at the University of Northwestern where she got a double major to make her effective at teaching children while making education FUN!






























We had so much fun making these! All the fun of sugar cookie cutouts with none of the sugary cookies afterward. Thanks!